


In over 11 years of my experience I have seen so many API's that have major security flaw. They either lack a proper setup of Authentication or Authorisation or both. The developers might feel okay since these endpoints are usually not public. But it is a huge security loop hole which anyone can easily target.
To better understand security for API's let's create a demo project for FBI. There will be an Admin who can enrol FBI Agents and change their clearance levels. Secondly FBI Agents with Clearance Level 1 will be able to access public files and agents with Clearance Level 2 will be able to access pubic & classified files.
First some theory! Not Interested? Take me to the code.
Authentication
Our Agent has successfully cleared all his exams; time to enrol him. In order to do that he will provide his documents and in return will get his badge.
In the above scenario providing documents is like login where once verified he will be provided with a token (badge). This process is called Authentication. It determines whether agents are who they claim to be.
We are going to use Json Web Tokens (JWT) Bearer tokens for authentication. Bearer tokens are a type of tokens generated by servers which contain details of the claims/roles of a user trying to login. Bearer tokens are mostly structured tokens like JWT. Read here to know more about JWT.
Authorisation
Now since the FBI Agent has got his badge he can enter the FBI building. He is also able to access public files, but when trying to access classified files he gets 401 error.
This is because FBI Agent is not authorised to access classified files. Authorisation determines what agents can and cannot access.
As mentioned above the JWT Bearer token contains claims/roles. Based on it, our server decides whether to give access to a private resource or not.
Access Flow
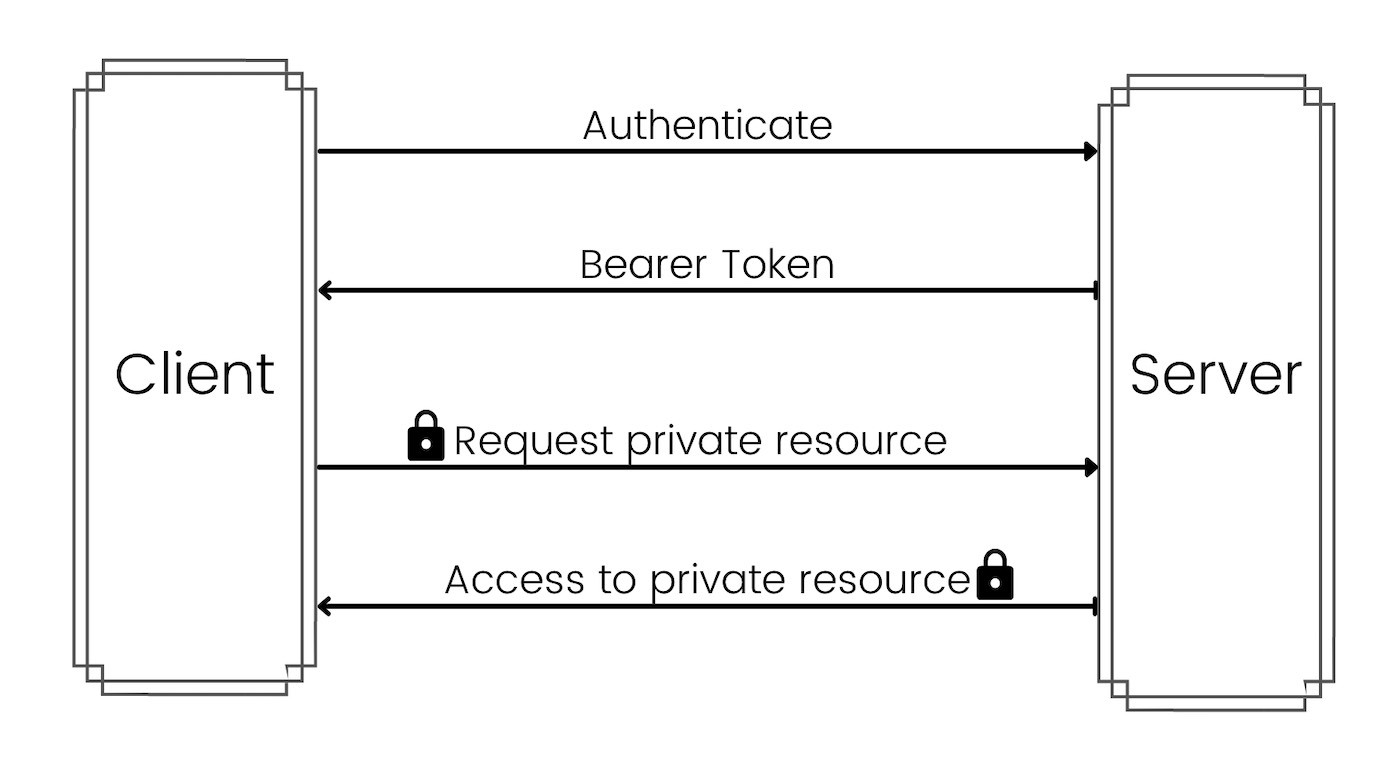
As you can see in the above diagram on successful login the server returns a Bearer token. The client uses the bearer token in subsequent calls to access a private resource.
These are the two main concepts that we are going to implement in our article.
Enough with the theory, show me some code!
Project Setup
Create a new project by executing the command dotnet new webapi --name FBI from your cli. It will create a project with a sample WeatherForecast api.
Why work on WeatherForecast when we can work on FBI. Go ahead and delete WeatherForecast.cs file.
Add dependencies by executing the commands
dotnet add package Microsoft.IdentityModel.Tokens --version 6.9.0
dotnet add package Microsoft.AspNetCore.Authentication.JwtBearer --version 5.0.4
In ConfigureServices function in your Startup.cs file add the below code.
var TokenValidationParameters = new TokenValidationParameters
{
    ValidIssuer = "https://fbi-demo.com",
    ValidAudience = "https://fbi-demo.com",
    IssuerSigningKey = new SymmetricSecurityKey(Encoding.UTF8.GetBytes("SXkSqsKyNUyvGbnHs7ke2NCq8zQzNLW7mPmHbnZZ")),
    ClockSkew = TimeSpan.Zero // remove delay of token when expire
};
We are defining the parameters for validating a token. Make sure that the length of the string for generating SymmetricSecurityKey is 32.
Next, setup the services to add authentication for API's.
services
    .AddAuthentication(options =>
    {
        options.DefaultScheme = JwtBearerDefaults.AuthenticationScheme;
    })
    .AddJwtBearer(cfg =>
    {
        cfg.TokenValidationParameters = TokenValidationParameters;
    });
The AddAuthentication method registers services required by authentication services. It also configures JWT Bearer Authentication as the default scheme.
The AddJwtBearer enables JWT-bearer authentication and setting the TokenValidationParameters defined above.
Now let's add some Authorisation claims for our Agent & Admin.
services.AddAuthorization(cfg =>
    {
        cfg.AddPolicy("Admin", policy => policy.RequireClaim("type", "Admin"));
        cfg.AddPolicy("Agent", policy => policy.RequireClaim("type", "Agent"));
        cfg.AddPolicy("ClearanceLevel1", policy => policy.RequireClaim("ClearanceLevel", "1", "2"));
        cfg.AddPolicy("ClearanceLevel2", policy => policy.RequireClaim("ClearanceLevel", "2"));
    });
The AddAuthorization method registers services required for authorisation. We are also adding claims for Admin, Agent, ClearanceLevel1 and ClearanceLevel2 by calling AddPolicy. A claim is a name value pair that represents what the subject is. Since clearance level 2 can also access clearance level 1 we have put "1", "2" in ClearanceLevel1. You can read more about claims here.
Lastly in the Configure method add the below line just above app.UseAuthorization();
app.UseAuthentication();
Admin Controller
Rename your file WeatherForecastController.cs to AdminController.cs. Do change the class name and constructor names as well. Finally, remove everything except the constructor.
using Microsoft.AspNetCore.Mvc;

namespace FBI.Controllers
{
    [ApiController]
    [Route("[controller]")]
    public class AdminController : ControllerBase
    {
        public AdminController() { }
    }
}
Login API
Let's create a login API for Admin so that she can get a token to perform other tasks.
[HttpPost]
[Route("[action]")]
public IActionResult Login([FromBody] User User)
{
    // TODO: Authenticate Admin with Database
    // If not authenticate return 401 Unauthorized
    // Else continue with below flow

    var Claims = new List<Claim>
            {
                new Claim("type", "Admin"),
            };

    var Key = new SymmetricSecurityKey(Encoding.UTF8.GetBytes("SXkSqsKyNUyvGbnHs7ke2NCq8zQzNLW7mPmHbnZZ"));

    var Token = new JwtSecurityToken(
        "https://fbi-demo.com",
        "https://fbi-demo.com",
        Claims,
        expires: DateTime.Now.AddDays(30.0),
        signingCredentials: new SigningCredentials(Key, SecurityAlgorithms.HmacSha256)
    );

    return new OkObjectResult(new JwtSecurityTokenHandler().WriteToken(Token));
}
In the above code User is a model with properties Username & Password. We are also creating an object of JwtSecurityToken using configurations that we have used in Startup.cs file. The token is then converted to string and returned in an OkObjectResult.
You can now open Swagger and execute the API to see a bearer token. A bearer token will be returned as you can see below.
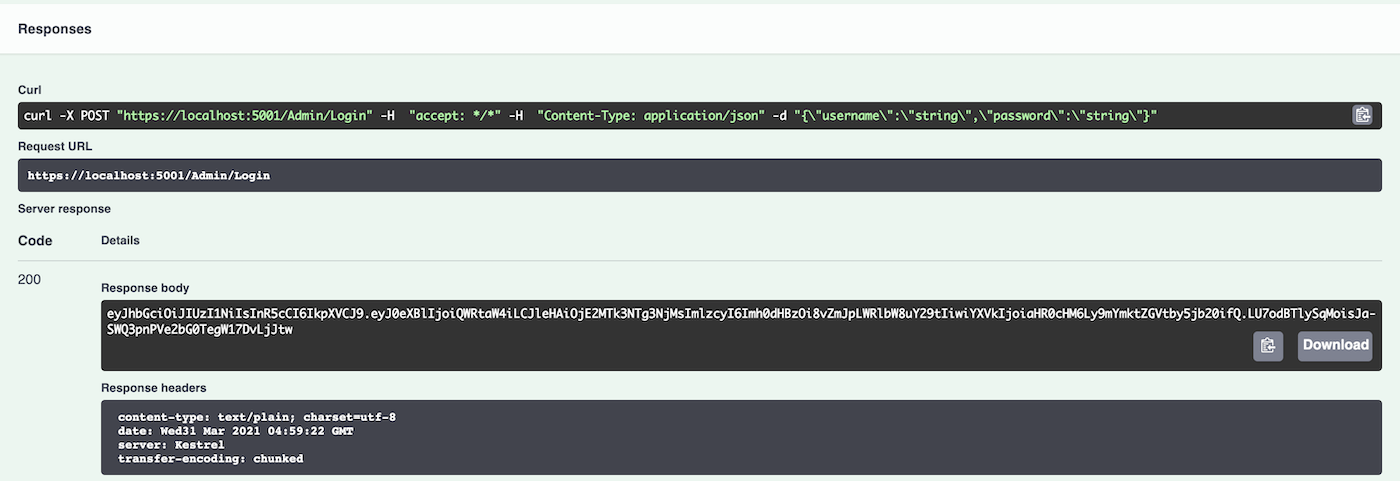
Keep the token handy since we are going to use it in the next section. You can also visit jwt.io to analyse your token.
Generate Badge API
Generating badge for an Agent is a sensitive task and should only be Authorised by an Admin. We are going to add an Authorize attribute for the GenerateBadge api.
[HttpPost]
[Route("[action]")]
[Authorize(Policy = "Admin")]
public IActionResult GenerateBadge([FromBody] Agent Agent)
{
var Claims = new List<Claim>
    {
        new Claim("type", "Agent"),
        new Claim("ClearanceLevel", Agent.ClearanceLevel.ToString()),
    };

    var Key = new SymmetricSecurityKey(Encoding.UTF8.GetBytes("SXkSqsKyNUyvGbnHs7ke2NCq8zQzNLW7mPmHbnZZ"));

    var Token = new JwtSecurityToken(
        "https://fbi-demo.com",
        "https://fbi-demo.com",
        Claims,
        expires: DateTime.Now.AddDays(30.0),
        signingCredentials: new SigningCredentials(Key, SecurityAlgorithms.HmacSha256)
    );

    return new OkObjectResult(new JwtSecurityTokenHandler().WriteToken(Token));
}
Here Agent is a model with properties Name as string and ClearanceLevel as int.
Now when you go back to swagger and try to execute GenerateBadge api it will give you 401 Unauthorised response. Since we have not passed the bearer token we are getting this error.
To be able to add the Authorize header in Swagger change the services.AddSwaggerGen as below:
services.AddSwaggerGen(c =>
{
    c.SwaggerDoc("v1", new OpenApiInfo { Title = "FBI", Version = "v1" });
    c.AddSecurityDefinition("Bearer", new OpenApiSecurityScheme
    {
        In = ParameterLocation.Header,
        Description = "Please enter JWT with Bearer into field",
        Name = "Authorization",
        Type = SecuritySchemeType.ApiKey
    });
    c.AddSecurityRequirement(new OpenApiSecurityRequirement {
    { new OpenApiSecurityScheme
            {
                Reference = new OpenApiReference { Type = ReferenceType.SecurityScheme, Id = "Bearer"}
            },
        new string[] {}
    }
    });
});
When you refresh Swagger in your browser you will notice an Authorize button on the right side above the list of apis.
Click on the newly added Authorize button in Swagger which will open up a dialog. We need to mention what type of token it is. So first enter Bearer in the field then a space and then the token generated from the /Admin/Login api from previous section.
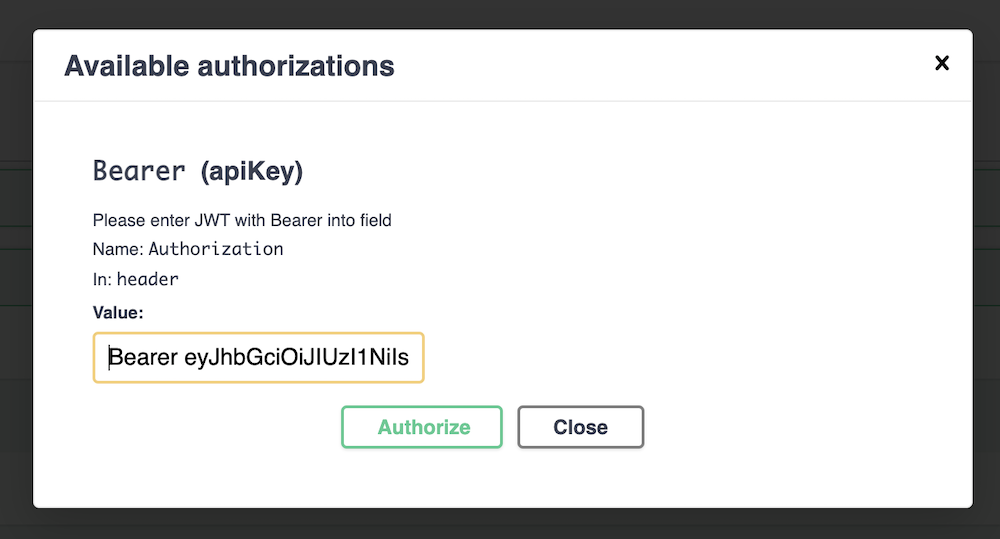
Click on the header to lock in the token. Now you are all set. When you execute the GenerateBadge api again you will get a token (analogous to badge). Keep this token handy, since we require in next section. Also make sure to pass ClearanceLevel as 1 for now.
Agent Controller
Create a new file AgentController.cs with below content.
using Microsoft.AspNetCore.Mvc;

namespace FBI.Controllers
{
    [ApiController]
    [Route("[controller]")]
    [Authorize(Policy = "Agent")]
    public class AgentController : ControllerBase
    {
        public AgentController() { }
    }
}
As you can see above we are authorising the whole controller for Agent's access only. So even Admin won't be able to access the API's we are going to create.
Access Records API's
Let's add the api's to access both public and classified files.
[HttpGet]
[Route("[action]")]
[Authorize(Policy = "ClearanceLevel1")]
public ActionResult<String> AccessPublicFiles()
{
    return new OkObjectResult("Public Files Accessed");
}

[HttpGet]
[Route("[action]")]
[Authorize(Policy = "ClearanceLevel2")]
public ActionResult<String> AccessClassifiedFiles()
{
    return new OkObjectResult("Classified Files Accessed");
}
We have added Authorize attribute's for both API's such that public files can be accessed by ClearanceLevel1 and classified files can be accessed by ClearanceLevel2.
If you try to access these API's with the Admin token you will get 403 Forbidden error. So go ahead and click on the Authorize button again and click on logout. Then, get the token from the above step and paste in the field with Bearer as a prefix i.e. Bearer .
Now when you access /Agent/AccessPublicFiles api you will see response 200 with message Public Files Accessed. But when you try the classified api you get 403 Forbidden error.
Changing Clearance Level
Fast forward 3 years and our Agent's performance has been mind bogglingly good. Management has now decided to promote him to ClearanceLevel2.
The Agent goes to the Admin and asks her to provide a token/badge with Clearance Level 2.
The Admin calls the /Admin/Login api to generate his own token first. She then enters it in the Authorize dialog.
/Admin/GenerageBadge api is then called by Admin with value 2 in the ClearanceLevel. This generates a new token/badge which she then hands over to Agent.
The Agent enters this token/badge in the Authorize dialog and when he now calls /Agent/AccessClassifiedFiles he is pleased to see the result Classified Files Accessed.
Conclusion
You can find the whole project here on github.
API security is extremely important and shouldn't be taken lightly even if it's for internal use only. Setup Authentication and Authorisation and you are halfway there.
There are other other security measures you can security against DDoS attacks, accepting API's from a particular IP or domain only etc.
How did you like the article? What are the other security measures do you usually take? Any feedbacks or comments?
You can checkout out more tutorials on here.